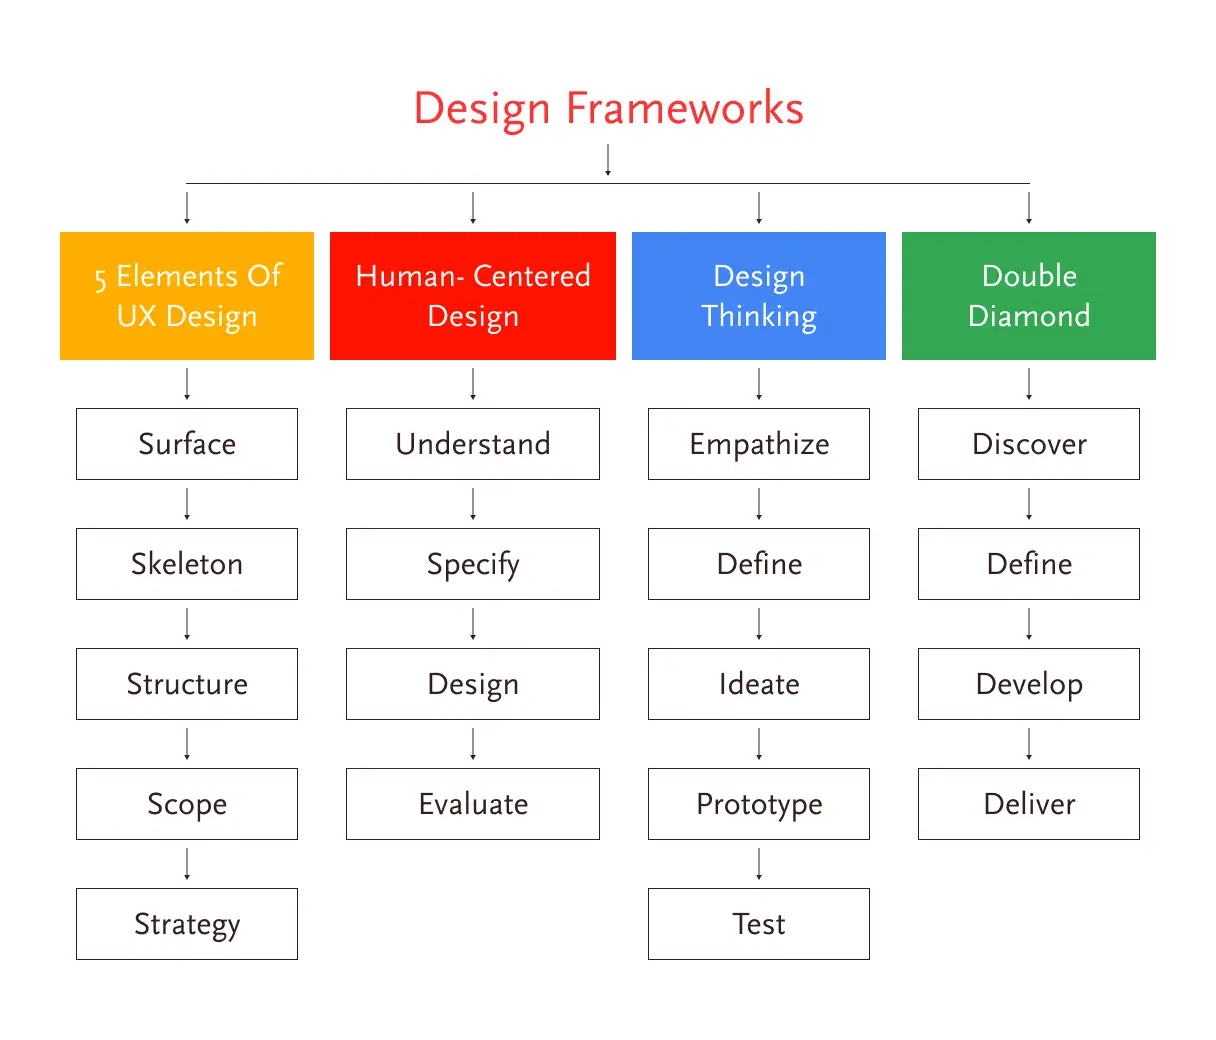
UX designers always keep a handful of problem-solving frameworks up their sleeves. And it wouldn’t be an exaggeration to say that Design Thinking is the most popular among them.
But mind you, Design Thinking has little to do with design in a typical sense. Here, think of “design” as a verb, not a noun. You’re not designing a thing (logos, icons, graphics), you’re designing a better outcome.
But before jumping ahead, let’s agree on what a framework is. Because as Socrates said, “The beginning of wisdom is the definition of terms.”
What Is a Framework
There are two ways to do a task:
- First, you just dive in and do it — no questions asked.
- Second, you take a moment to understand the task, apply some systematic thinking, and take a calculated approach to accomplish it.
For example, imagine you’re renovating your home. You call two people.
The first one shows up and starts working right away, without paying much attention to you or the task. When you ask questions, he says:
- he knows his stuff,
- he keeps all the calculations in his head,
- he has been doing this for a long time, and
- that’s just how he works.
Then the second person arrives. But instead of jumping straight to the task, he first tries to understand:
- you and the context around renovation,
- your requirements and expectations,
- your timeframe and budget, and
- any homes you like or are inspired by.
And then he offers you a range of logical options to make your space feel more aesthetically pleasing and spacious. He includes you in the process right from the beginning. So you always feel informed and in control. And that gives you confidence that things are moving in the right direction. It becomes a collaborative process that brings out the best in both of you.
The second person uses a human-centered approach to solve your problem. And it helps him work systematically, make better decisions, and stay aligned with you, all without killing creativity. That’s what a framework is.
Now, renovating a small home is a relatively simple process. But think about managing a large project involving hundreds of people across different departments working under a tight budget and a short timeline.
You need a robust framework that makes collaboration easier and keeps everyone on the same page at all times. But that framework shouldn’t stifle people’s risk-taking abilities, because innovation depends on it.
Enter Design Thinking. But…
Design Thinking =! Human-Centered Design
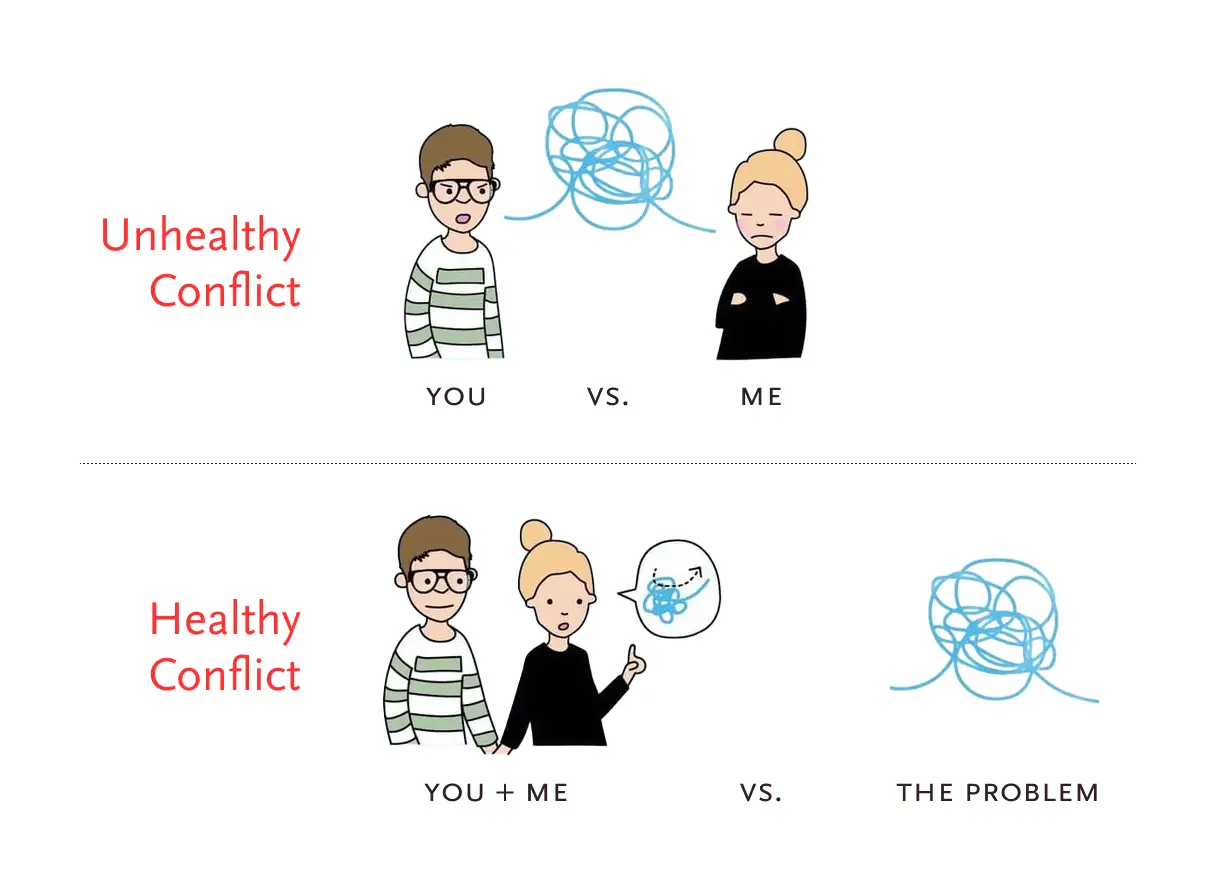
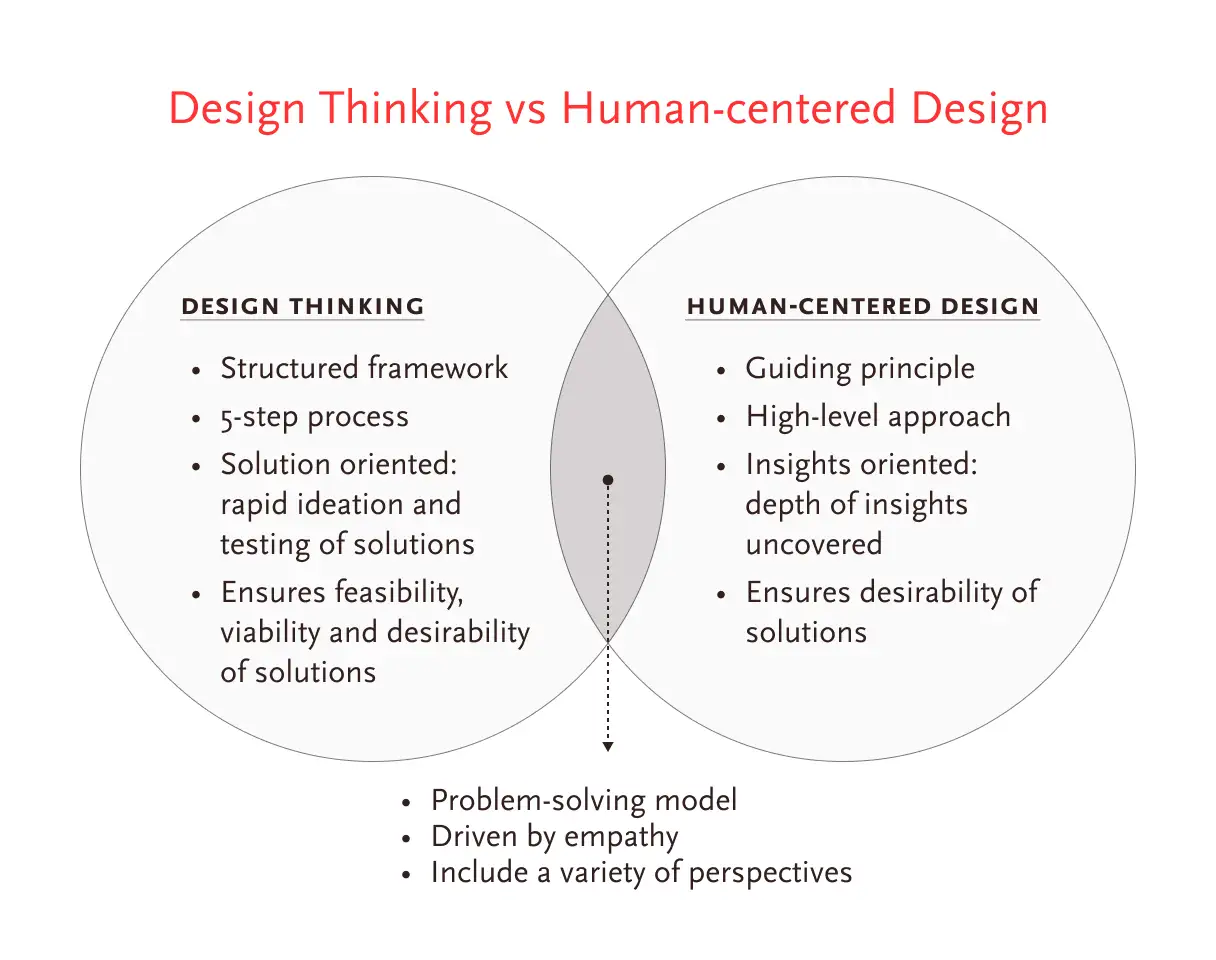
Human-Centered Design (HCD) and Design Thinking (DT) are often used interchangeably but they are not the same. While both function as a philosophy and a framework, HCD prioritizes user needs above all else, whereas DT seeks a balance between desirability, feasibility, and viability.
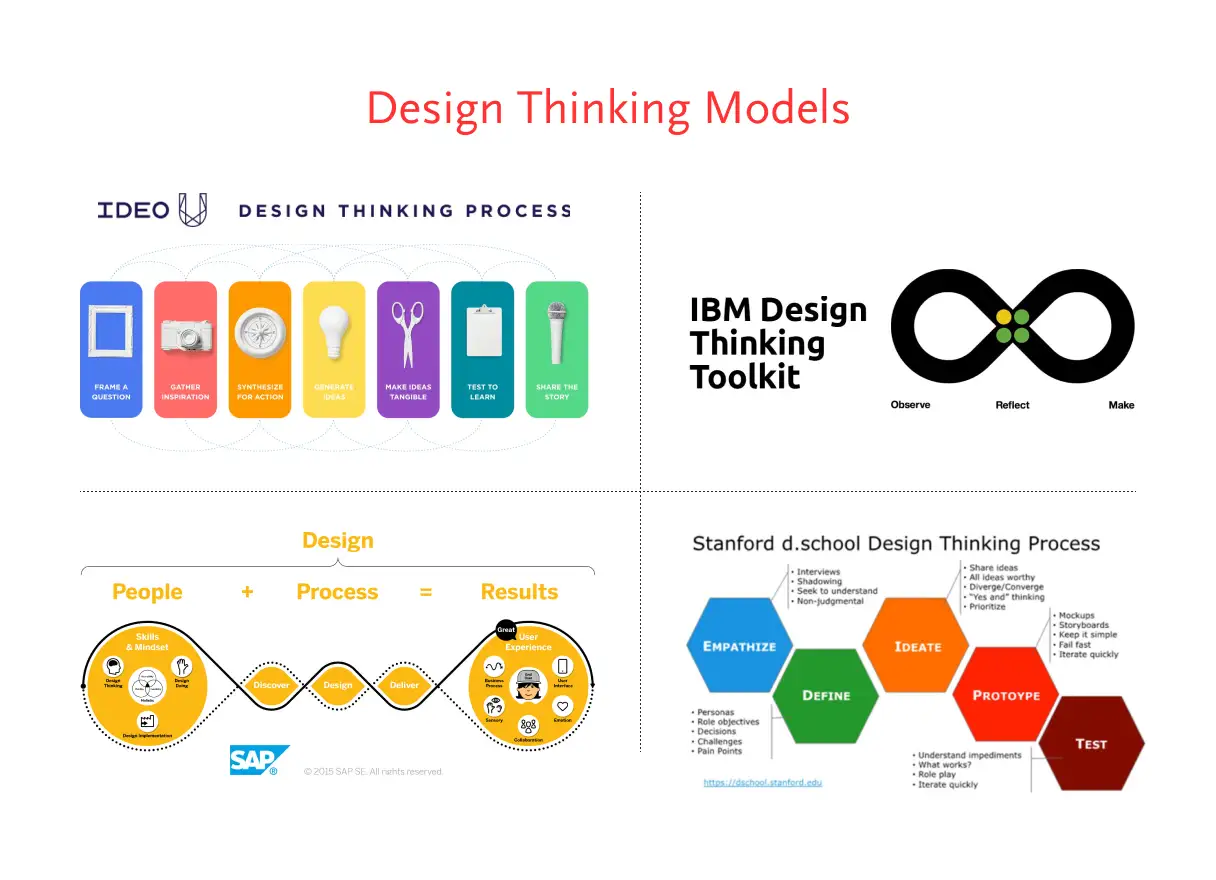
However, like HCD, Design Thinking also allows you to define your own philosophy and framework. And that is exactly what organizations like IBM, SAP, Stanford, and IDEO have done. They have tailored their own framework to suit their unique needs.
All Roads Lead to “The Sciences of the Artificial”
You should explore all the variants of Design Thinking out there. But for the sake of this article, I’ll focus on the most famous version. It’s created by The Hasso Plattner Institute of Design at Stanford, also known as d.school. BTW Hasso Plattner is the co-founder of SAP, who donated $35 million to establish the institute.
But truth to be told, most Design Thinking frameworks are essentially the same. And you won’t miss much if you skip the others. Because nearly all of them trace their roots back to one key source — Herbert Simon’s book, The Sciences of the Artificial.

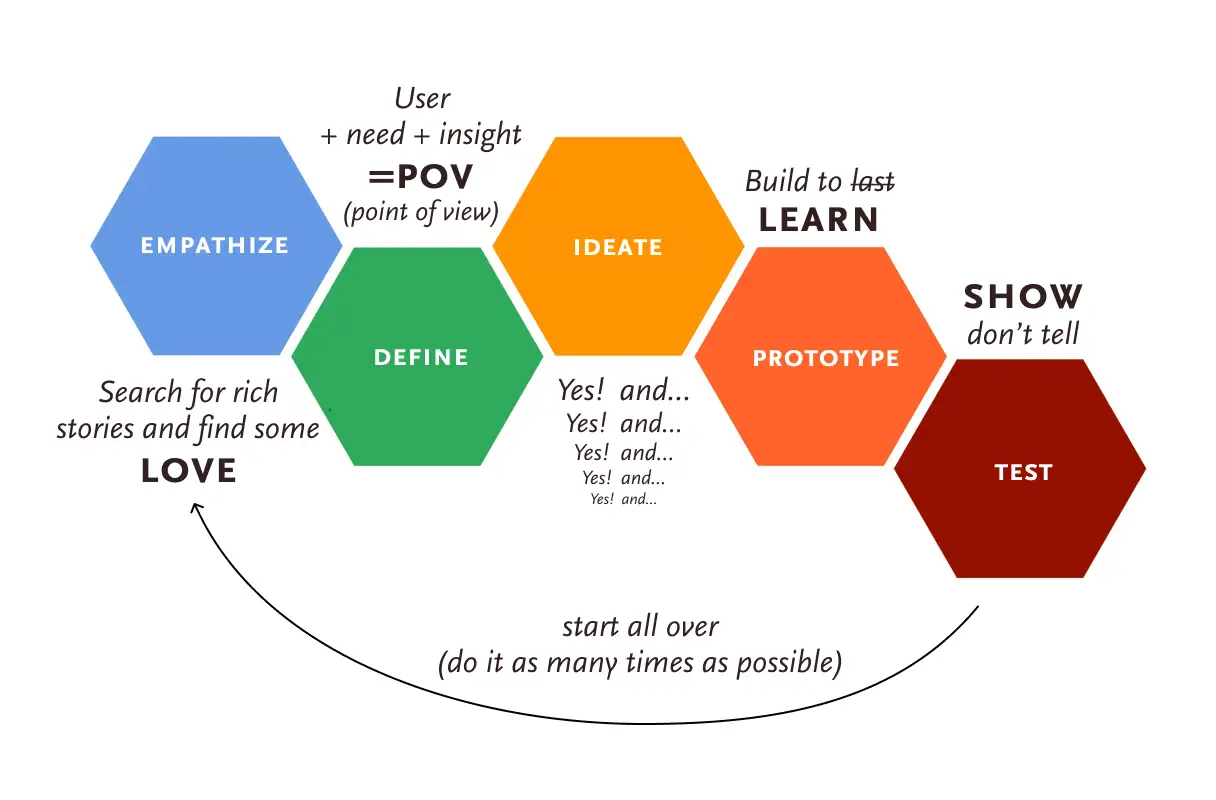
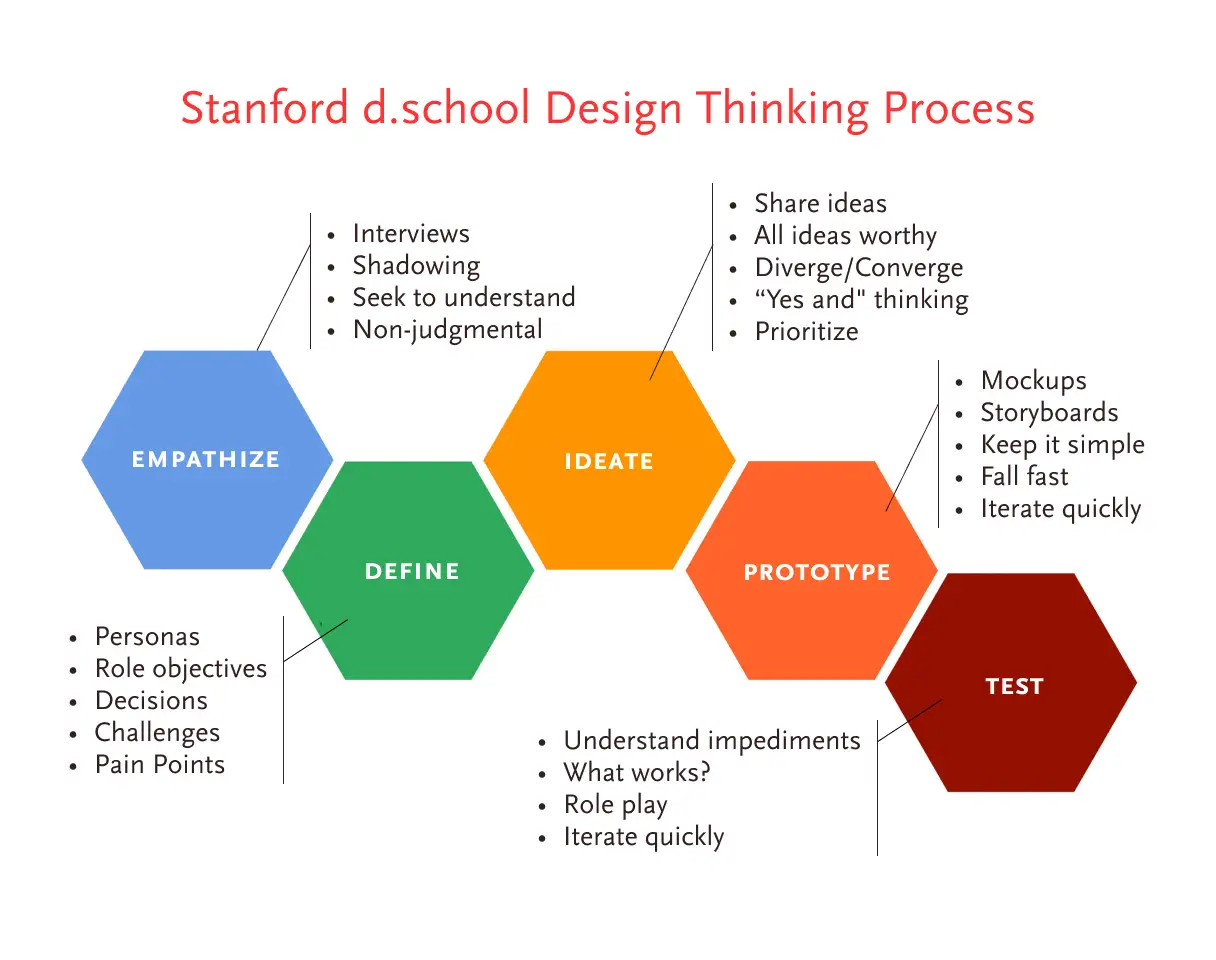
So let’s take a look at Stanford’s Design Thinking Process.
Just a last word of caution!
If It Sounds Like a Code, Run
Over the last decade, Design Thinking has spread across other industries. And institutions like Stanford, HBS, and the IITs now sell their own Design Thinking courses. You have probably received messages on LinkedIn urging you to pay a hefty fee of money to learn it.
But today, many people pursue Design Thinking courses not to solve real problems, but to decorate their profiles. They treat it like an honorary badge, hoping it will help them to climb the corporate ladder. Beware of courses that begin with arbitrary or fanciful abbreviations and come marked with a ®, ©, or ™. These often signal branding over substance.
Okay, rant over. Time to get into the actual framework.
Stanford Design Thinking Process
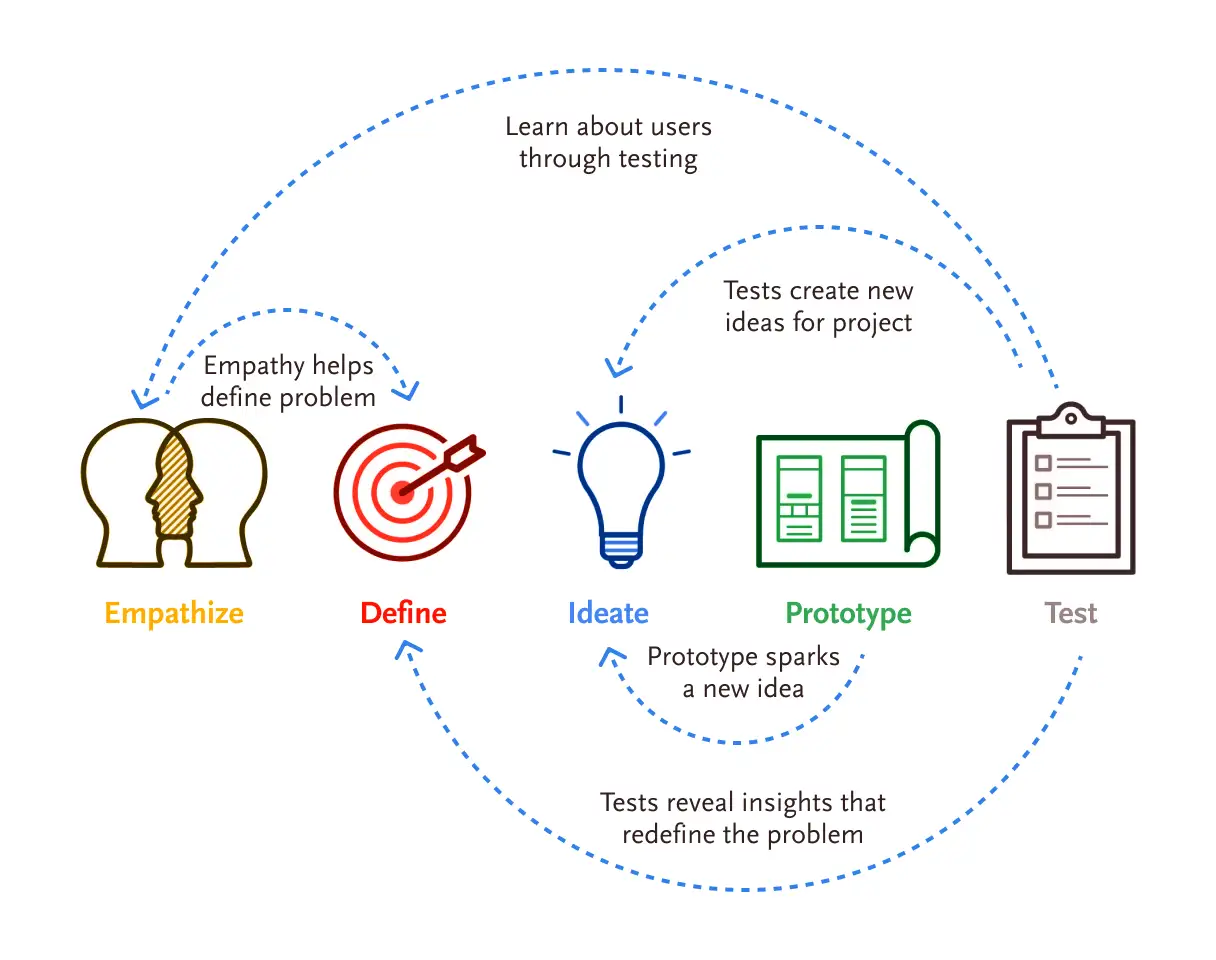
You can use Stanford’s (or d.school’s) Design Thinking process to uncover the root causes of a problem, define it clearly, and solve it systematically.
Although it might look like a linear process, it’s actually non-linear and iterative. This means you can start at any step, repeat a step multiple times, or even move back and forth depending on what the problem demands.
There are 5 steps in the process:
- Empathize
- Define
- Ideate
- Prototype
- Test
Here’s a quick overview of each step.
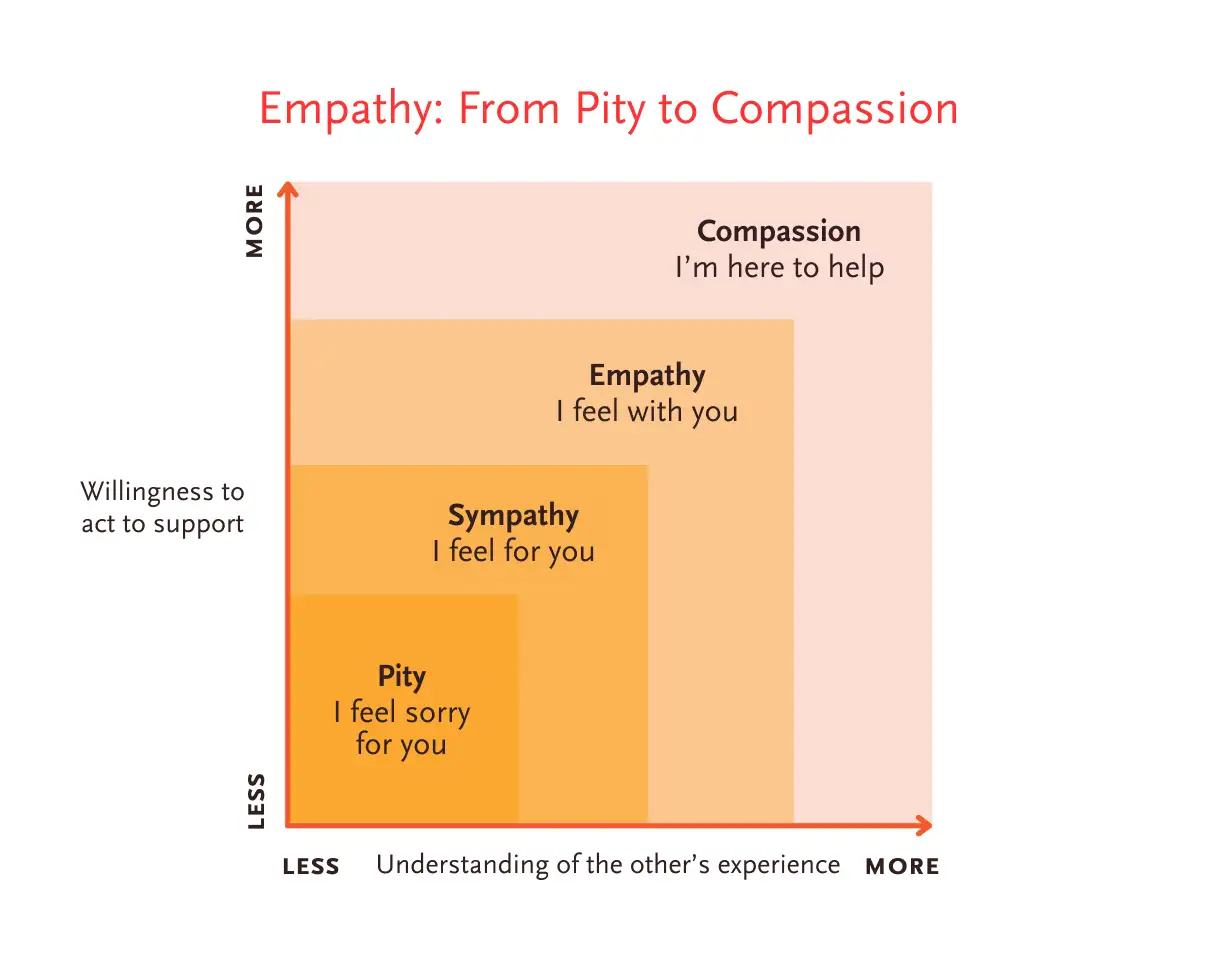
1. Empathize
You begin the process by empathizing with both the business’s objectives and the users’ pain points. And to do this you meet with stakeholders — the people impacted by the project.
Stakeholders can be internal or external.
- Internal stakeholders are typically founders, C‑suite executives, product managers, or team members who have a vested interest in the project.
- External stakeholders are usually the end users for whom you’re building the product.
A kickoff meeting is the first official gathering of all stakeholders to launch a new project. It’s where you understand your role, responsibilities and what’s expected of you. Sometimes, your perspective might differ from theirs. And that’s exactly why clear and frequent communication is a key.
Most of the time, the issues we label as “problems” are just symptoms. You might fix them, but the problem comes back. So to solve the root cause, you have to dig deeper. That means talking to users by sending a questionnaire or survey, or conducting in-person, phone, or video interviews.
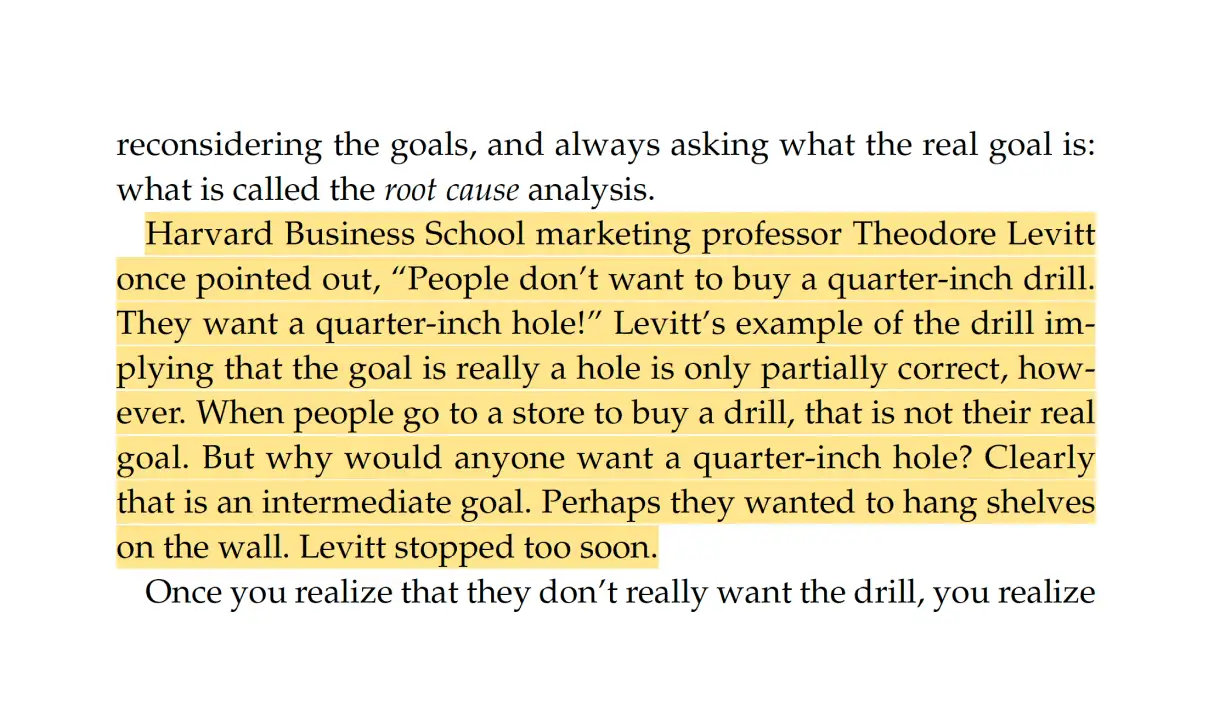
But the best way to uncover real insights is to observe people in their natural environment. Sure, you can interview them in your office, but as David Travis puts it: “A user research that takes place out of context is like a visit to the zoo, whereas going into your user’s context is like going on safari.” Just as animals show their best behavior in the wild, humans reveal their true behavior when they don’t feel like they’re being watched.
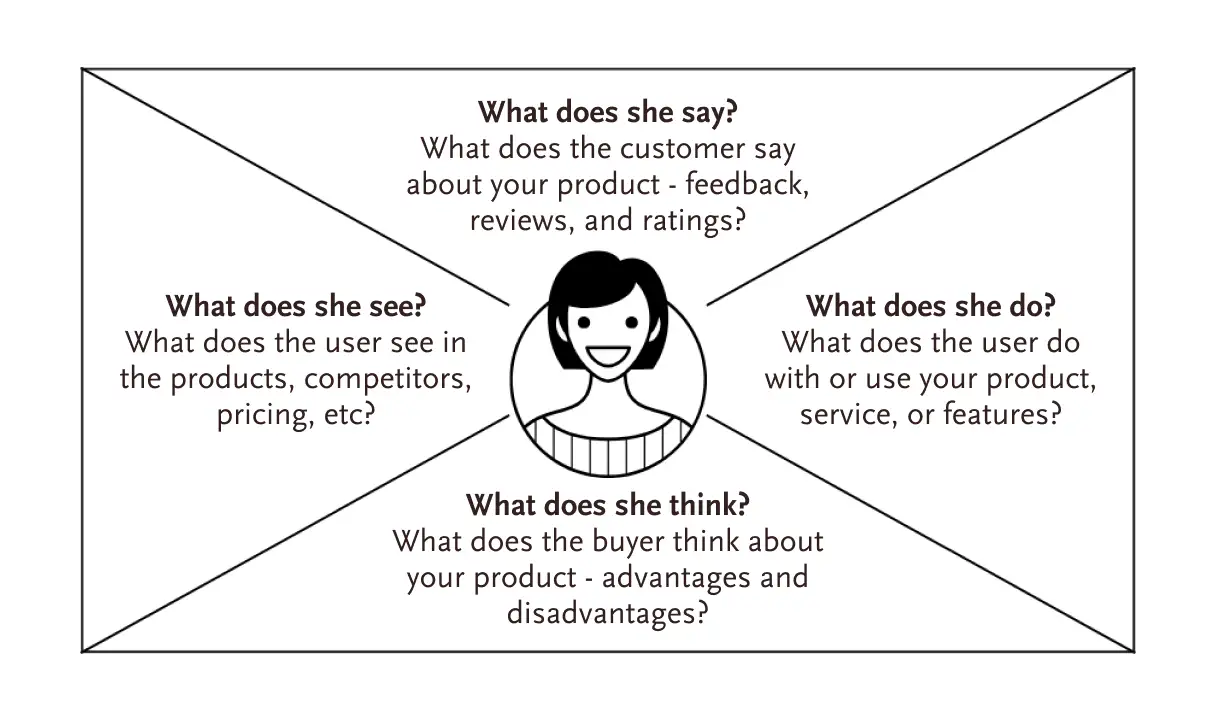
After finishing your research, you’re left with a ton of data that needs to be logically arranged. And one of the great tools for this is an empathy map. Take an A4 sheet and write the name of the participant. Divide the page into 4 sections labeled: Do, Say, Think, and Feel. And place your data in their appropriate sections based on what the participant did, said, thought, or felt.
Now you have the research to back your decisions, but remember, people don’t empathize with data. They connect with stories, not spreadsheets. So to bring a human touch to data, we use another powerful tool, called the user persona. A user persona is a fictional character that represents your business’s target audience.
To make the persona feel human, we give it a name, an image and some demographic details. Some teams even go a step further to create a dedicated space in their offices with a desk and a chair for their persona. They place a life-size standee and surround it with items related to that persona, just to feel their presence during the design process.

Once the personas are ready, we move on to the next step: Define.
2. Define
The goal of this step is to define the problem statement. While personas humanize user research, the problem statement defines the core issue that’s worth solving. A good problem statement should be:
- Human-centered
- Broad enough to allow creative freedom, and
- Narrow enough to actually get solved.
The most common framework to build a problem statement is the 5Ws and 1H. Alternatively, you can use the following template:
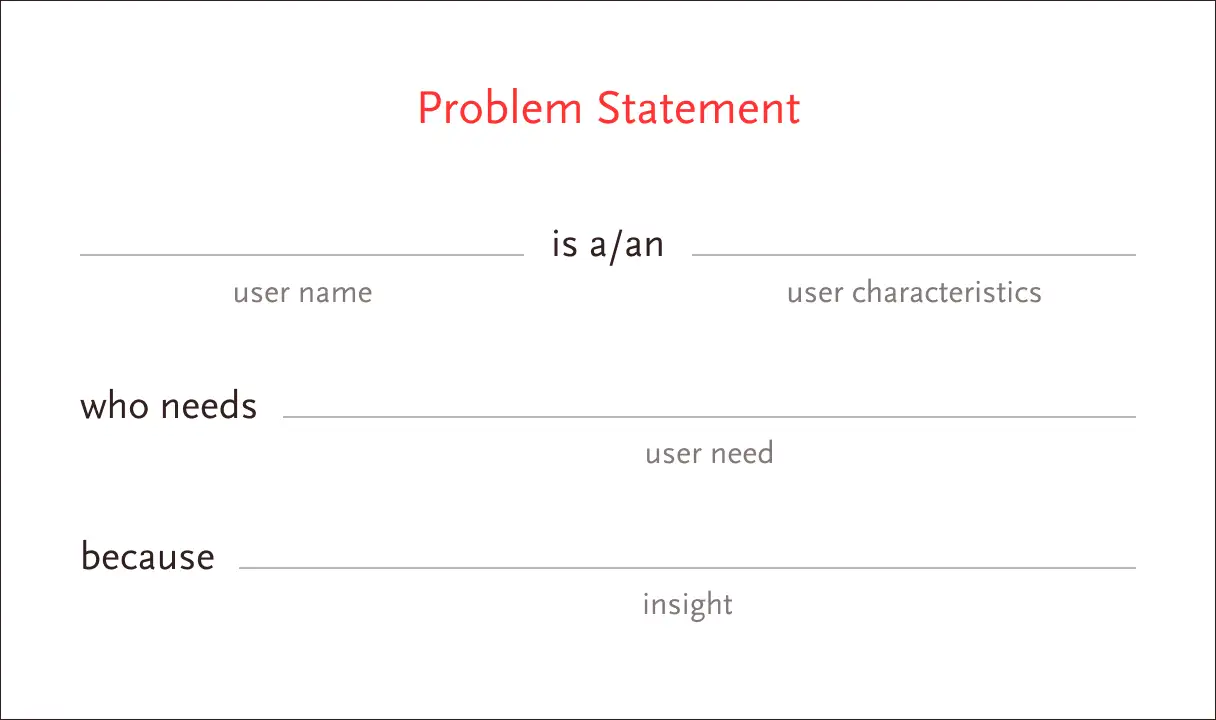
For example: Indian housewives struggle with last-minute grocery shortages because nearby stores don’t always have stock and home delivery is unreliable. They need a fast and dependable way to get groceries and fresh produce, because they want to manage daily household needs without relying on others.
Now, a problem statement defines the big-picture. But to solve it, you need to break it down into user-focused actions that lead to the solution. Enter the user story — a fictional, one-line statement told from the persona’s point of view that informs design decisions. A typical user story format:
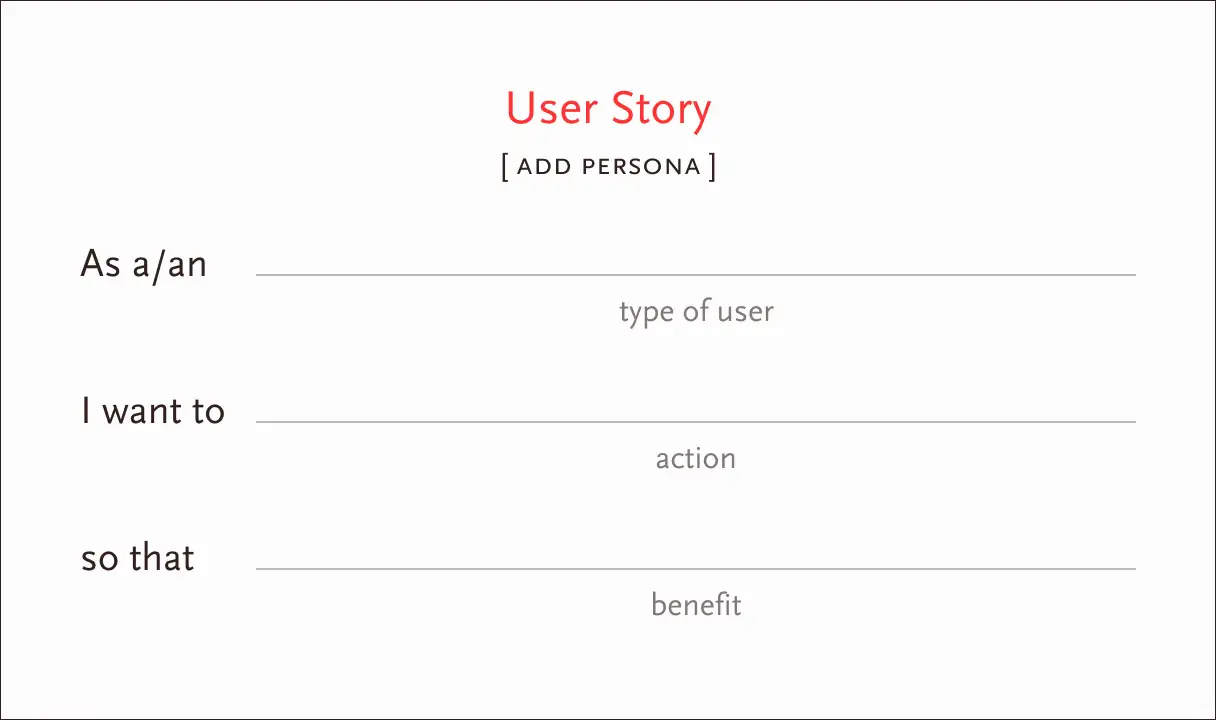
For example:
- As a housewife, I want to quickly find and order groceries online, so that I don’t have to make last-minute trips to the store.
- As a user, I want to track the live status of my delivery, so that I know when to expect my order.
These user stories show actionable needs, but they don’t show what happens before, during, and after that moment. That’s where a user journey map comes in and helps you to visualize:
- Her anxiety when she finds she’s out of groceries
- Her frustration when the app is slow
- Her relief when delivery arrives on time
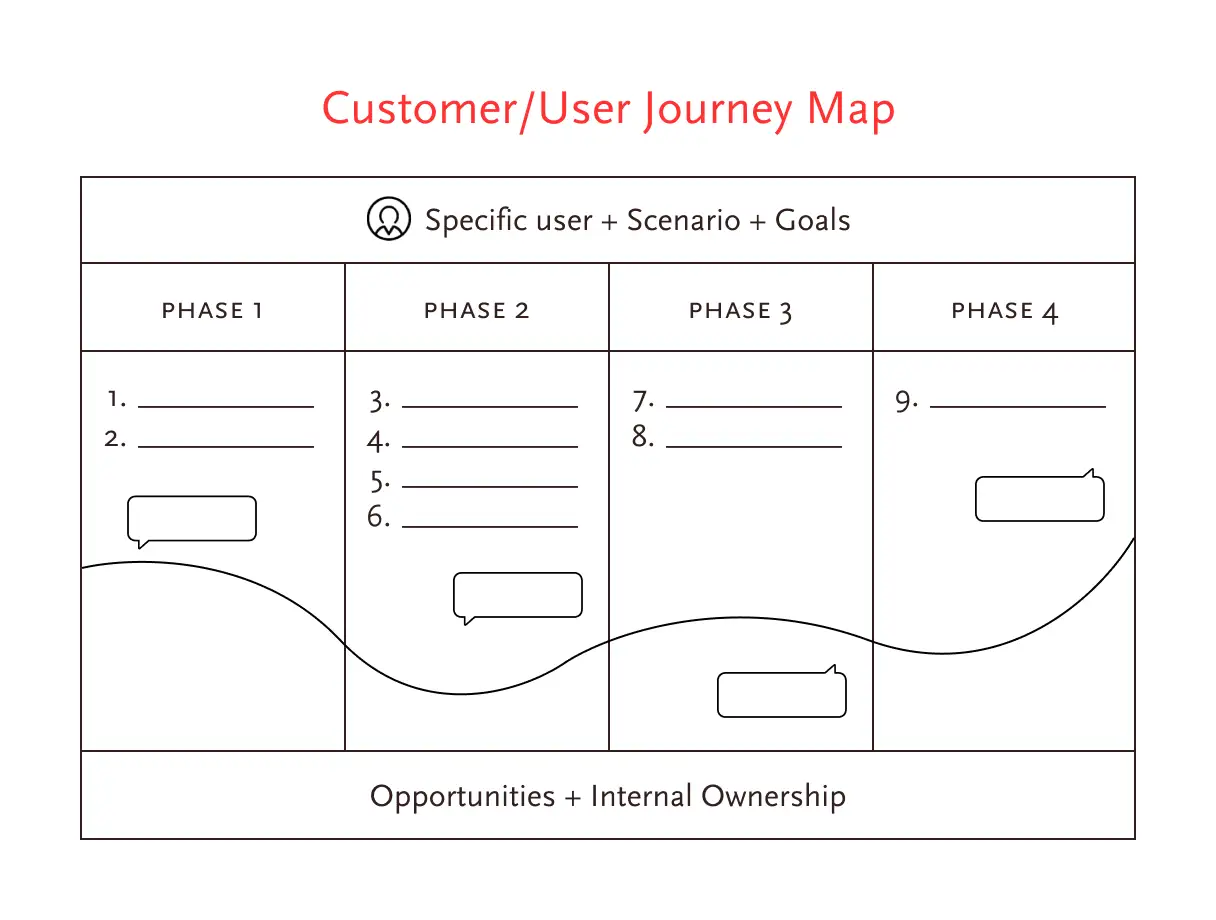
A user journey map brings context to the story. It reveals gaps, pain points & opportunities that aren’t visible in isolated user stories.
After you have defined your problem statement, written user stories, and mapped out the user journey, the next step is to form a few hypotheses to figure out the right solutions. There are a couple of formats:
- If / Then
- We believe that…
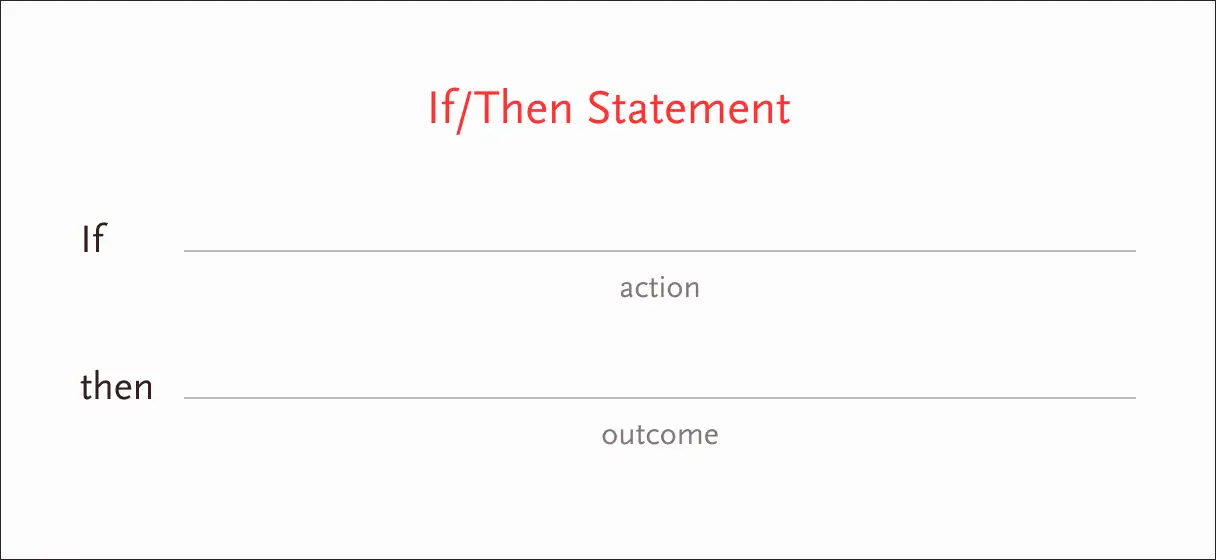
Example: If housewives use a service that delivers groceries and fresh produce within 15 minutes, then they can stop worrying about last-minute shortages and avoid last-minute trips to the store. Or
We believe that a service that can deliver groceries and fresh produce in 15 minutes, will help housewives to stop worrying about last-minute shortages and avoid last-minute trips to the store.
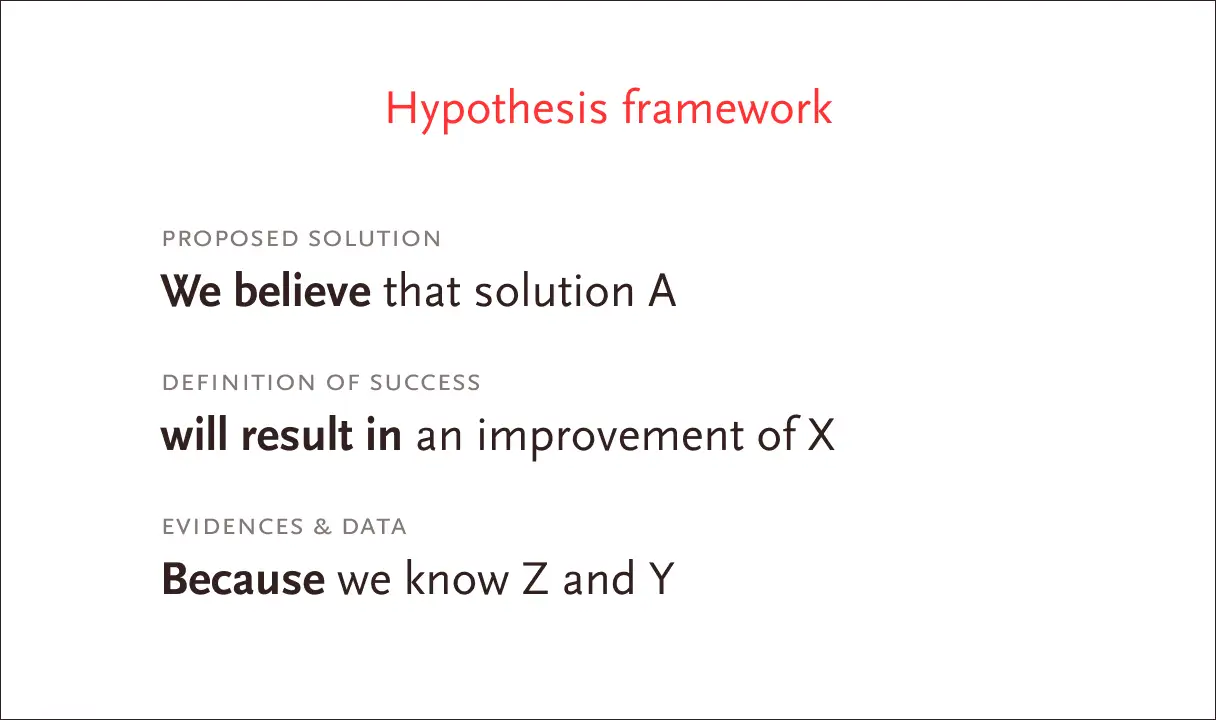
If/then statements directly focus on user needs, whereas, we believe that… statements take your team perspective in account, while staying empathetic to users. As you move forward in the design process, you’ll adjust your hypothesis as you learn more about your users.
One last thing: whenever you build a product, always think from the users’ perspective. How do they differentiate your product from the existing ones? What is your USP (Unique Selling Proposition)?
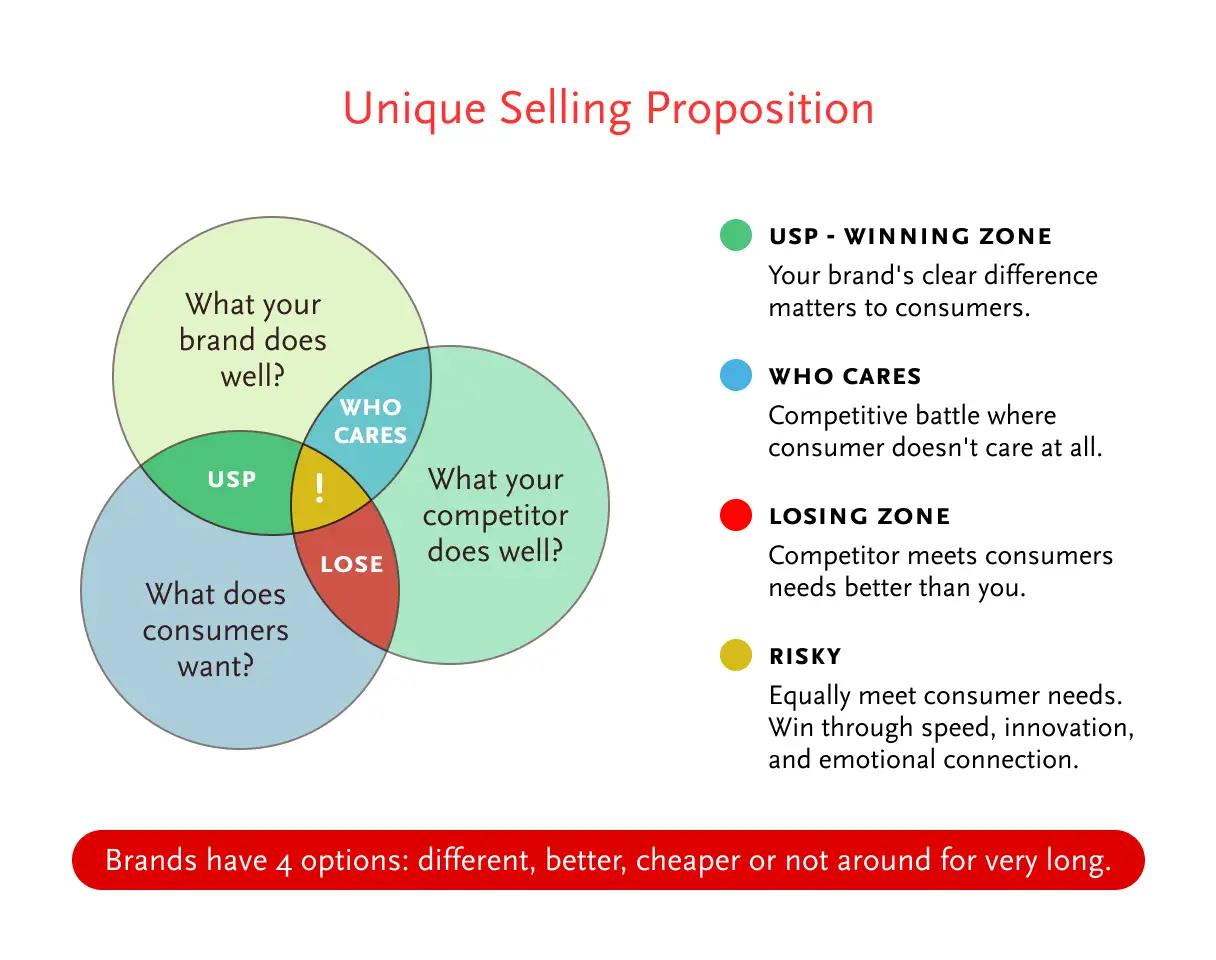
A value proposition explains how your product stands out from others in the market. It is similar to a user story but a user story is written from the users’ perspective, while a value proposition is written from the business’s point of view. When writing your value proposition, don’t think about implementation. Just let your imagination run free.
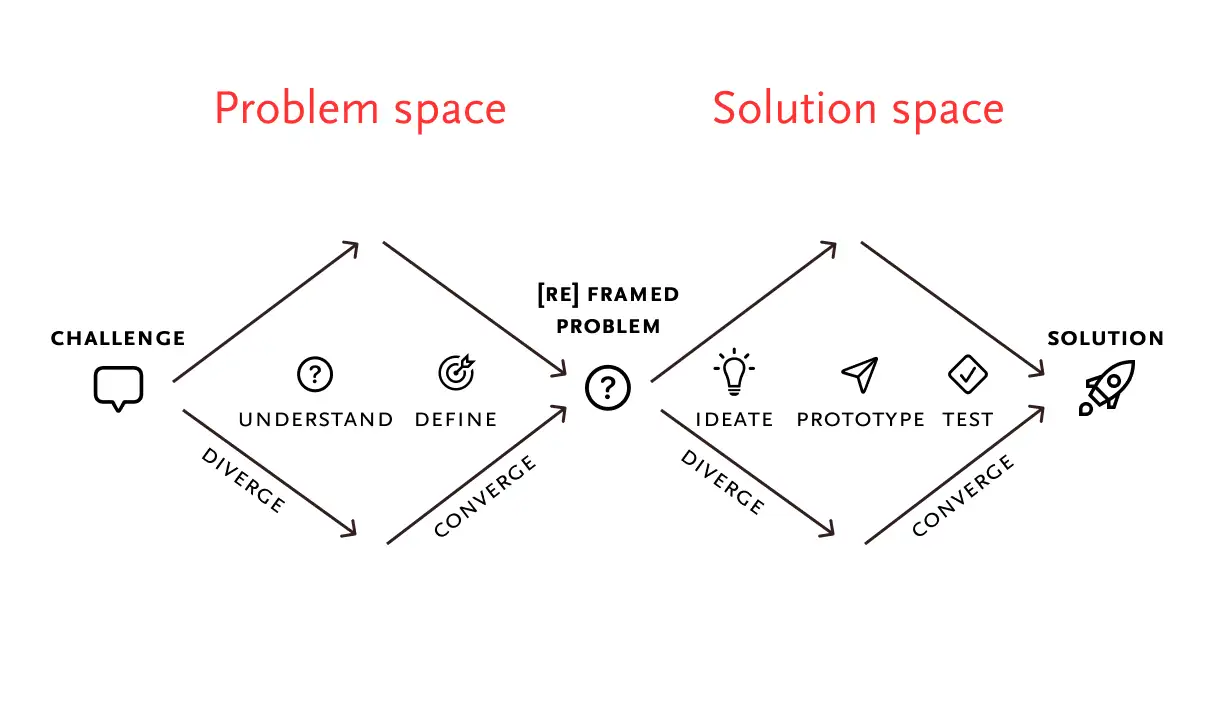
So far, we’ve covered the first two steps of Design Thinking: Empathize and Define. Together, they form the problem space, where the goal is to identify the problem. Now that we’ve defined the problem, let’s move into the solution space — Ideate, Prototype, and Test.
3. Ideate
Ideation is all about collaboration. Call every person invested in the project and give them free rein to generate as many ideas as possible that solve the problem statement. Encourage them to think out of the box—wild ideas that seem impossible or even laughable—and don’t judge them.
Designers are often in a hurry to show their design prowess as soon as they hear the problem statement. But your first idea or the most obvious one, is usually not the best. So first, generate lots of ideas, then select the best among them. And to do that, many tools and techniques are available.
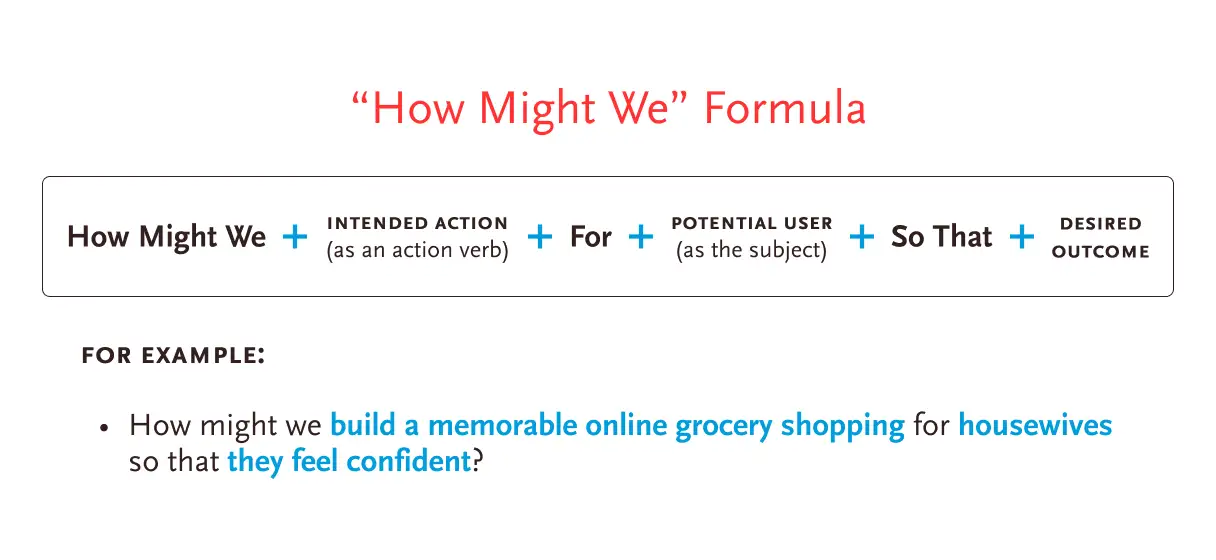
One of the most effective is the “How Might We” question technique. HMW (How Might We) acts as a bridge between the Define and Ideation phases. It breaks down a problem statement into actionable design opportunities. Let’s take a few examples to see it in action.
- How might we build a memorable online grocery shopping for housewives so that they feel confident?
- HMW deliver in 15 minutes for everyone so that users don’t miss nearby stores?
- HMW sell affordably without compromising quality for everyone so that people don’t switch to competitors?
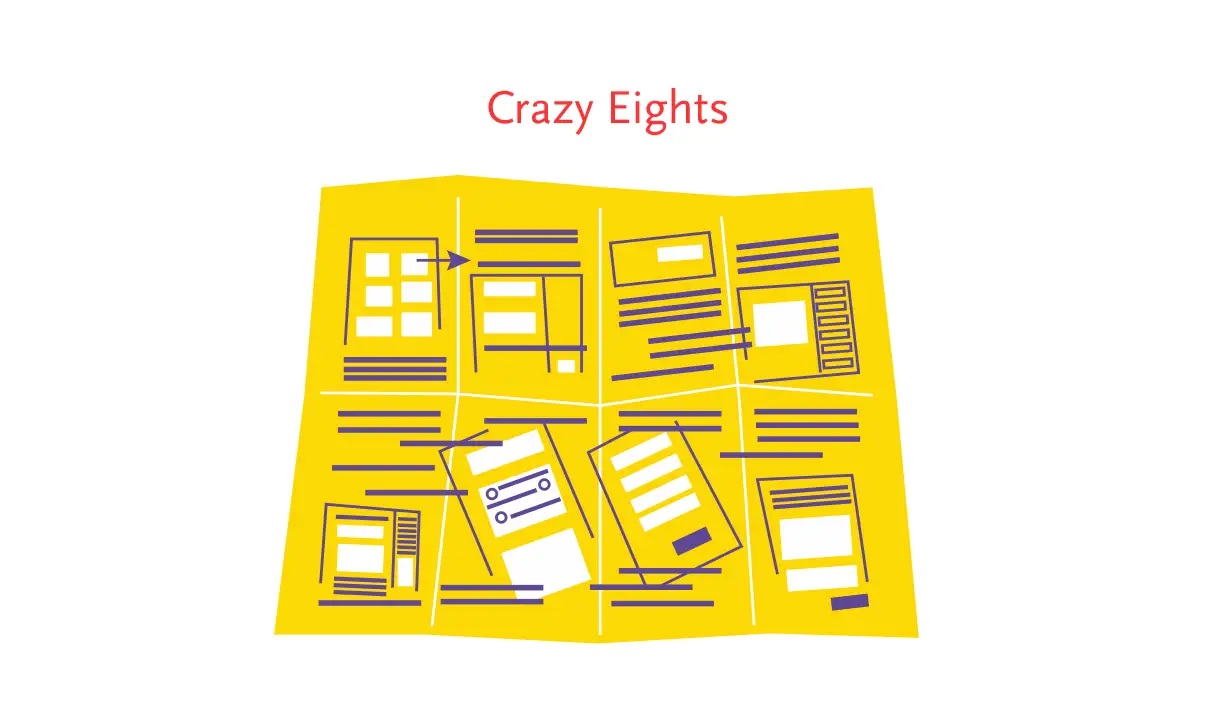
But what if you’re more comfortable sketching out your ideas rather than writing them down? Don’t worry, there is a simple rapid sketching technique called Crazy 8 for visual thinkers. And here’s how it works:
- Take an A4 sheet.
- Fold it in half 3 consecutive times to make 8 sections.
- Set a timer for 8 minute.
- Spend 1 minute on each section, sketching out 8 different ideas.
You don’t have to limit yourselves to 8 ideas. It’s all up to you. Draw as many or as few ideas as you wish.
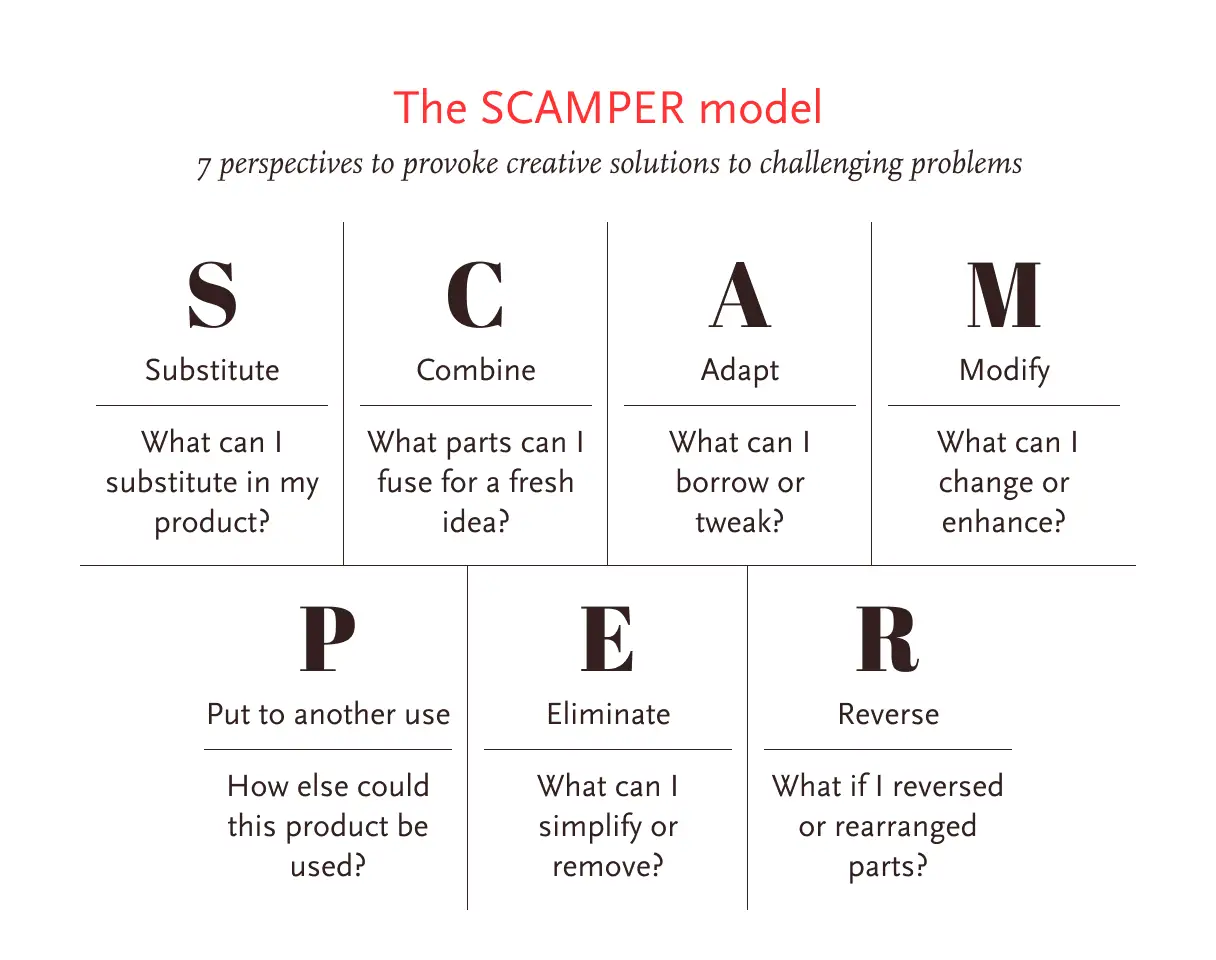
Another ideation tool that I love is called SCAMPER — an acronym where each letter stands for a different strategy to help spark new ideas. It is similar to the Four Actions Framework (Eliminate, Reduce, Raise, Create), introduced by Chan Kim and Mauborgne in their book Blue Ocean Strategy. And both methods help businesses develop new market spaces by adding, removing or modifying traditional industry factors.
Once you have a pool of ideas, write each on a separate Post-it and let everyone vote for their favorites. You can also use IDEO’s DVF framework to ensure your ideas are socially desirable, technically feasible and economically viable.
I also like to conduct competitive audits at this stage. While most UX designers prefer to do this during the Empathize phase, I find that analyzing competitors’ products too early can unintentionally influence my decisions.

We conclude the Ideate phase by crafting a goal statement — a few lines that define your product and how it will benefit your users. Here is a template to follow:

You can pull the what, who, why, and how from your research.
- Who → from Personas
- What → from User Stories
- Why → from Empathy and Journey Maps
- How → from Brainstorming
Example: Our Fetchit app will let users get daily household items within 15 minutes which will affect busy housewives to live a more enjoyable, confident, and stress-free life by giving them a fast and reliable way to get groceries and fresh produce without relying on others. We will measure effectiveness by tracking delivery success rate and customer satisfaction.
4. Prototype
Writing or sketching your ideas feels great, but seeing and interacting with a real product is a completely different experience. So get real and start building your solution. But don’t aim for a polished, full-fledged working product right away. Start quick and dirty because despite all your research, you still don’t have any real user validation. And you don’t want to spend six months building a product people reject. So take it slowly.
Start by outlining the user flow to get a clear picture of how your product will work. Use simple shapes to map out each interaction:
- Circle → an action the user takes.
- Rectangle → a screen the user sees.
- Diamond → a decision point or question.
- Lines → connect everything and show the flow.
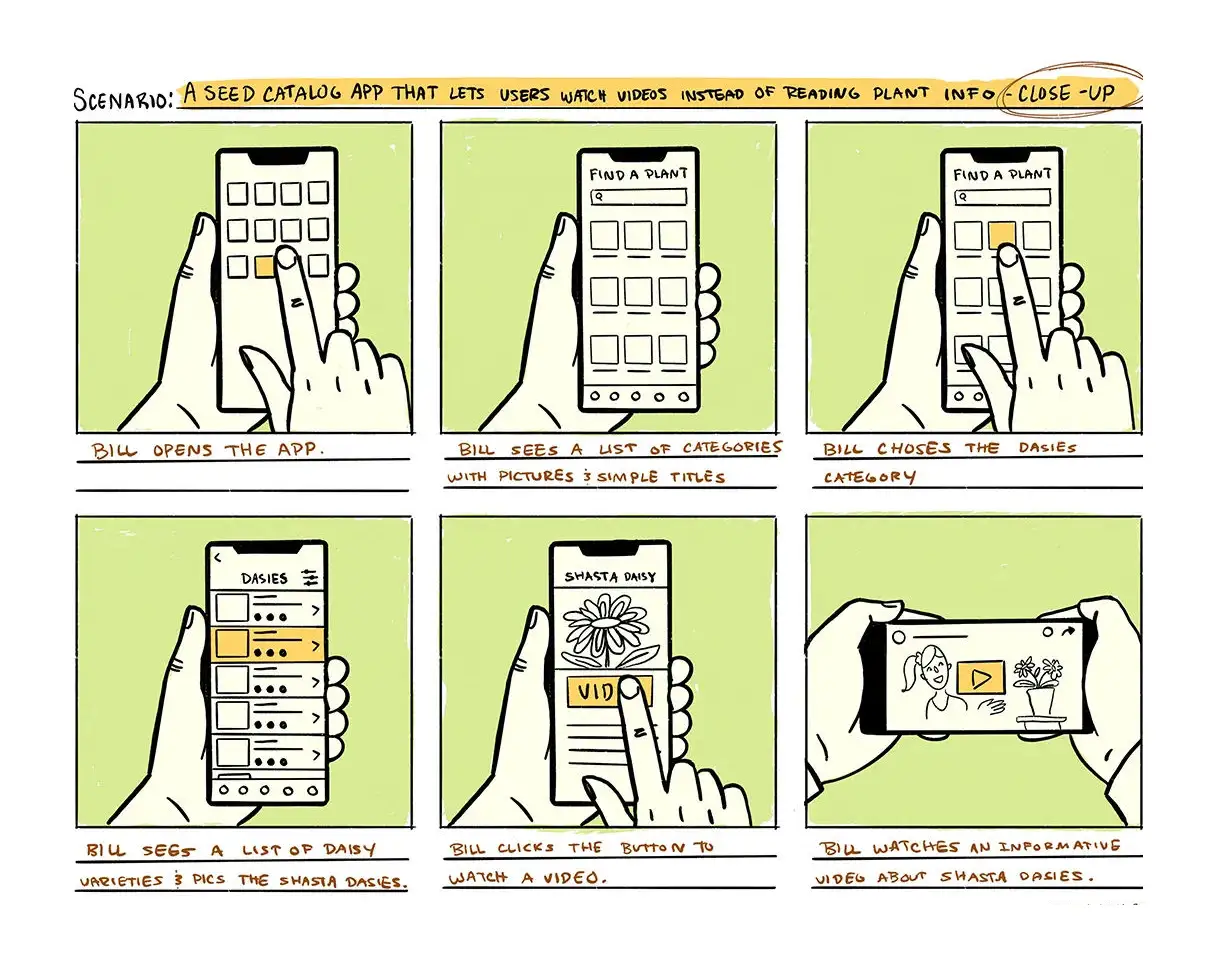
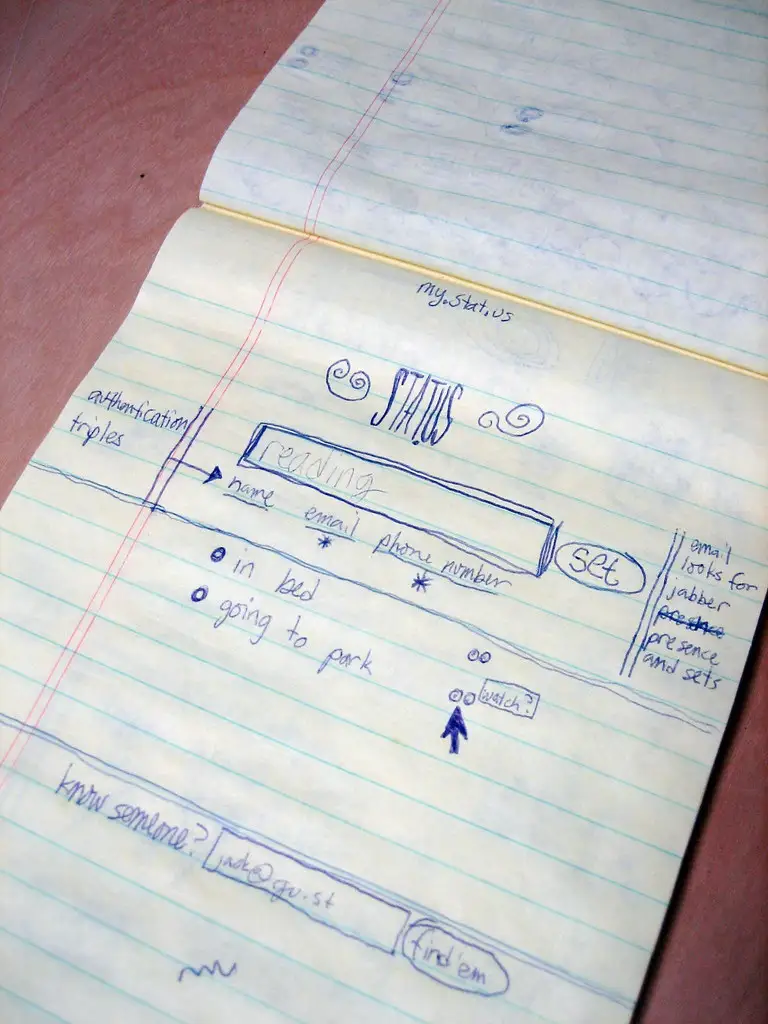
Next comes storyboarding — sketching your ideas on paper and showing them to stakeholders to get their approval before committing big resources. There are 2 ways to create storyboards:
- Big-picture storyboards show the overall user experience.
- Close-up storyboards focus on specific product interaction.
Start with a scenario. Scenario is a sentence that captures your users and their problem. The image’s caption describes each frame of the story. If you’re early in the process, use big-picture storyboards to show your high-level ideas to stakeholders. A close-up storyboard is more useful after you have explored your initial design directions.
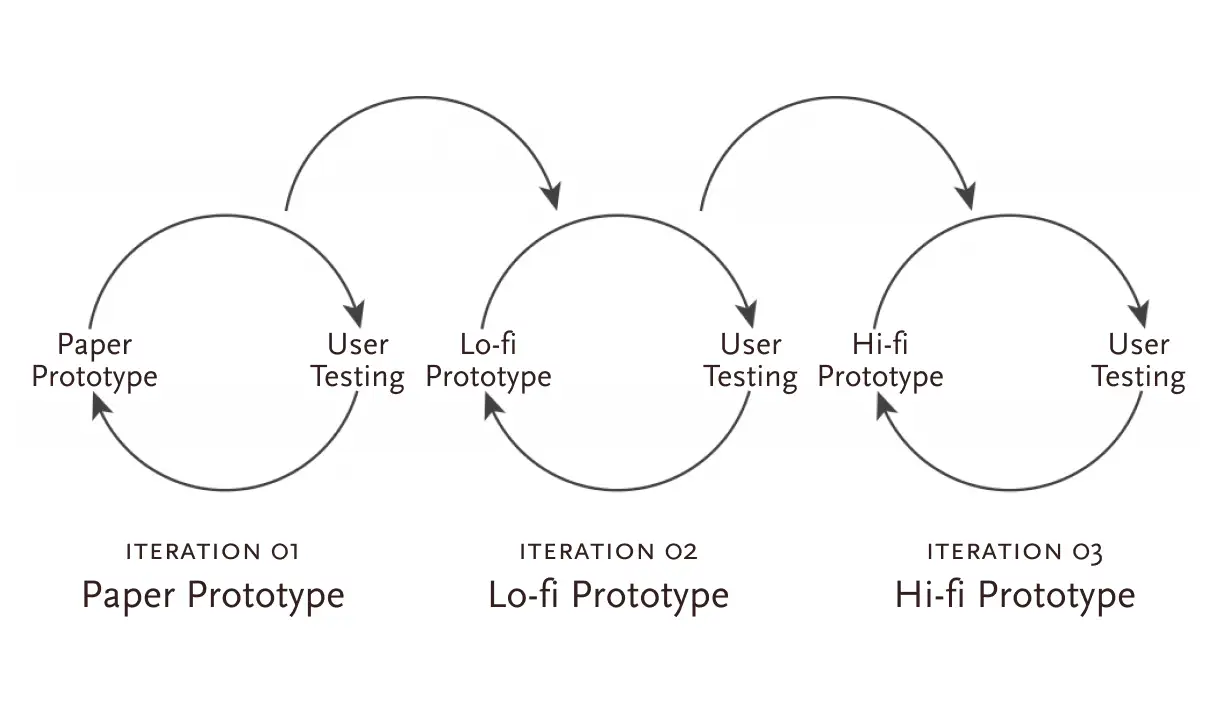
Have you noticed, we haven’t touched any design software or even a computer so far? And you can still keep going without it. Now, it’s up to you how closely you want your design (fidelity) to match the final product.
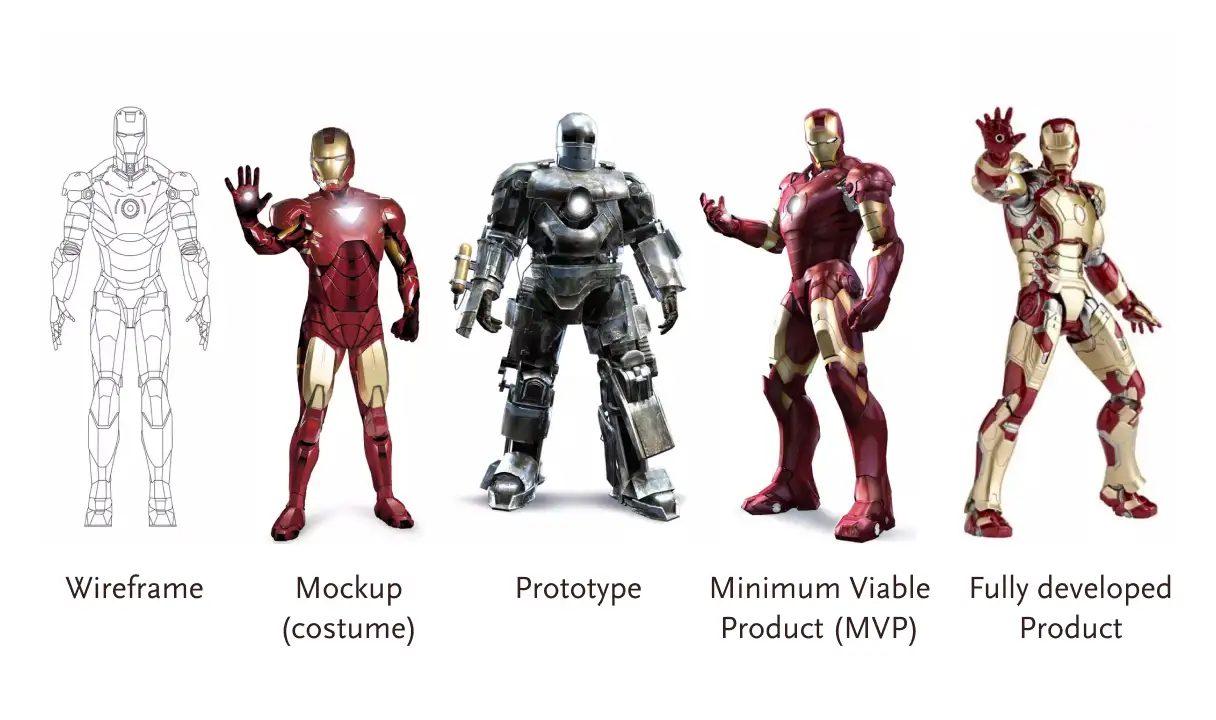
On screen, UX designers usually start with low-fidelity designs like wireframes. By looking at your wireframe, stakeholders can easily grasp your product’s layout, flow, or functionality, and offer feedback on whether you’re heading in the right direction.
Only after receiving a go-ahead, move to high-fidelity designs, such as:
- Mockups to build your product aesthetically pleasing.
- Prototype to make it interactive.
- MVP to include just enough features for early customers to provide feedback.
Once you and your stakeholders are satisfied with the result, it is time to move to the final stage of Design Thinking: Test, and find out if your idea is truly worth its salt.
5. Test
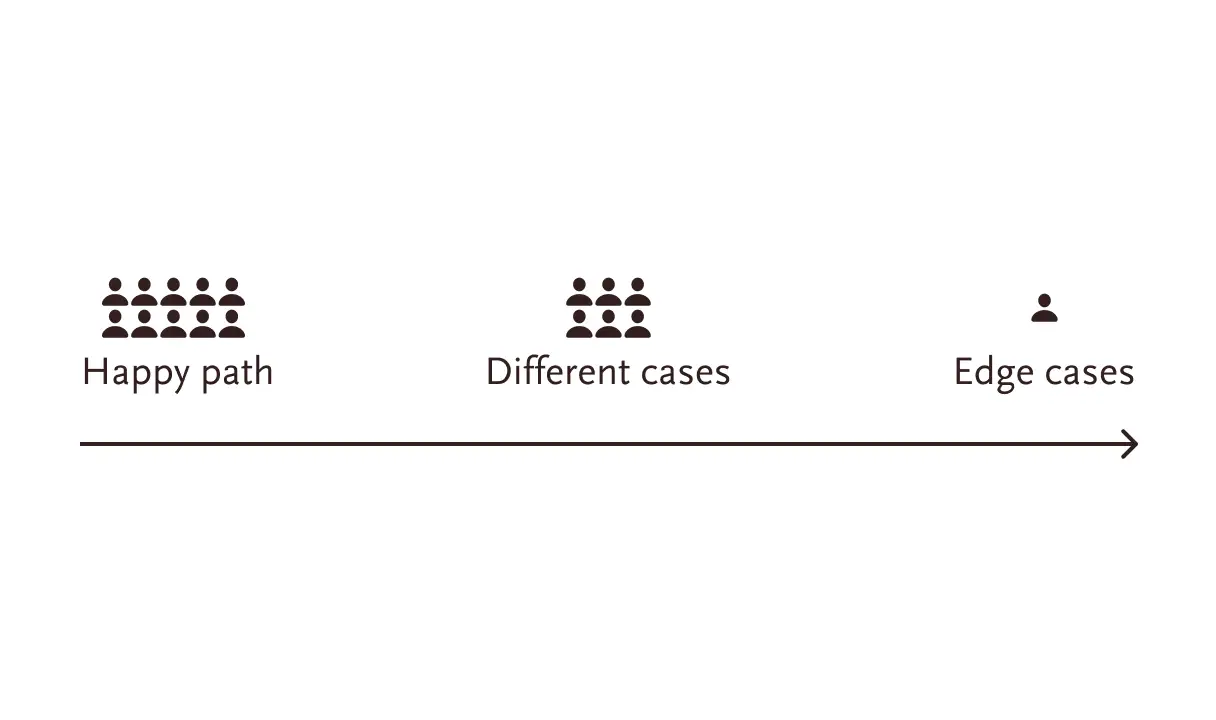
As the name suggests, in this stage, you test your product at three levels. First, you and your team test the product to ensure everything works perfectly. Make sure to cover all use cases including edge or corner cases.
Once you are satisfied with the results, then comes the second round. Here, you invite all the internal stakeholders to use the product. And ask them questions like:
- Is the product fulfilling their expectations?
- Are they happy with the result?
- Do they want to add or remove something?
Take their feedback and observe their reactions. If they suggest any changes, go back to the Prototype stage to incorporate them. You will probably have to go back and forth between the Prototype and Test stages a few times to sort out all the wrinkles. Remember, greatness lives in the repetitions.
Also, refine your prototype with every iteration. Once all internal stakeholders are satisfied, its time for the final round—where you find out whether you’ve truly built something valuable. Here, you invite potential or existing customers to test your product and share their unfiltered feedback. And the most common way to do this is through usability testing.
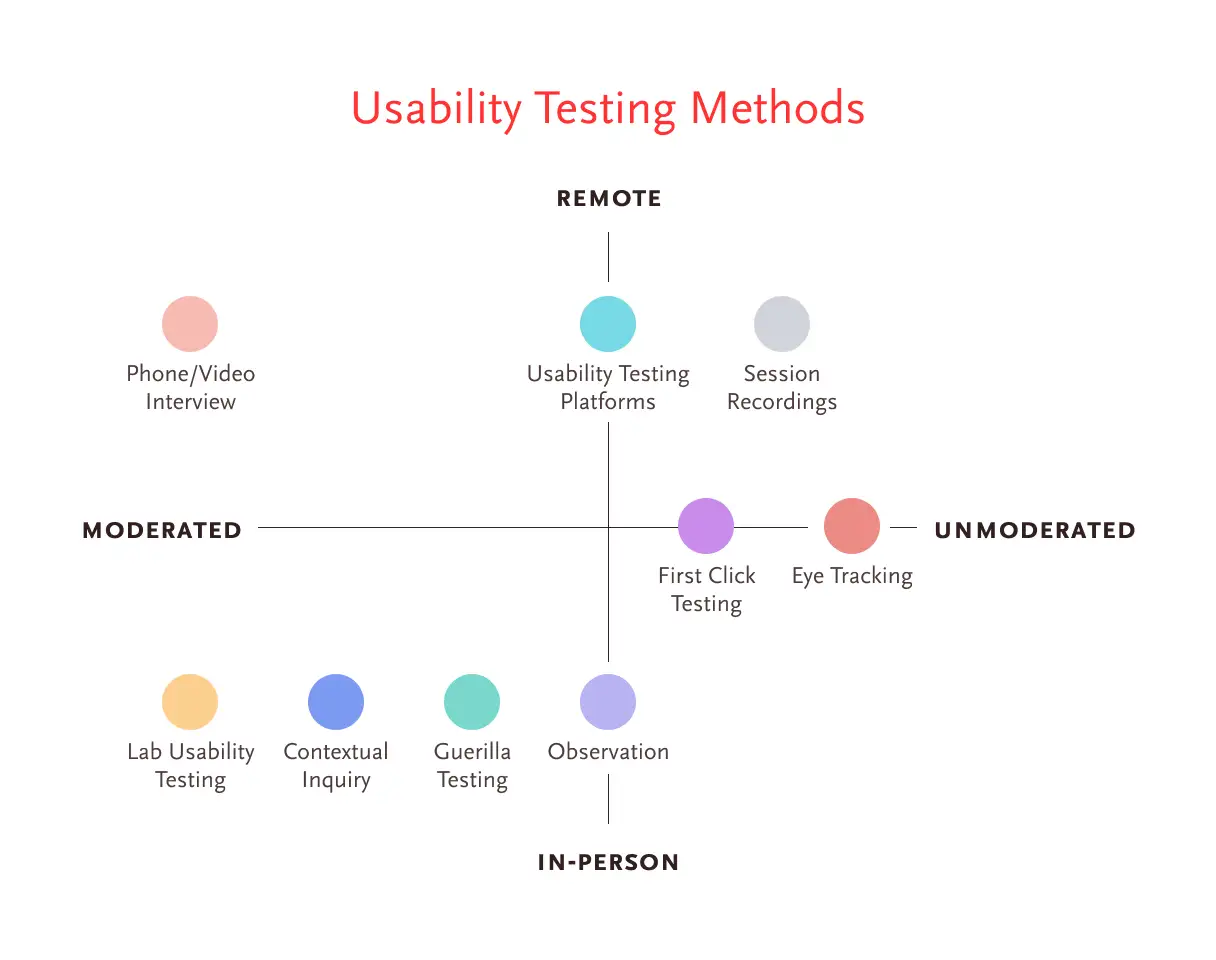
In a usability test, you ask users to perform a specific task using your design while you observe their behavior and listen to their feedback.
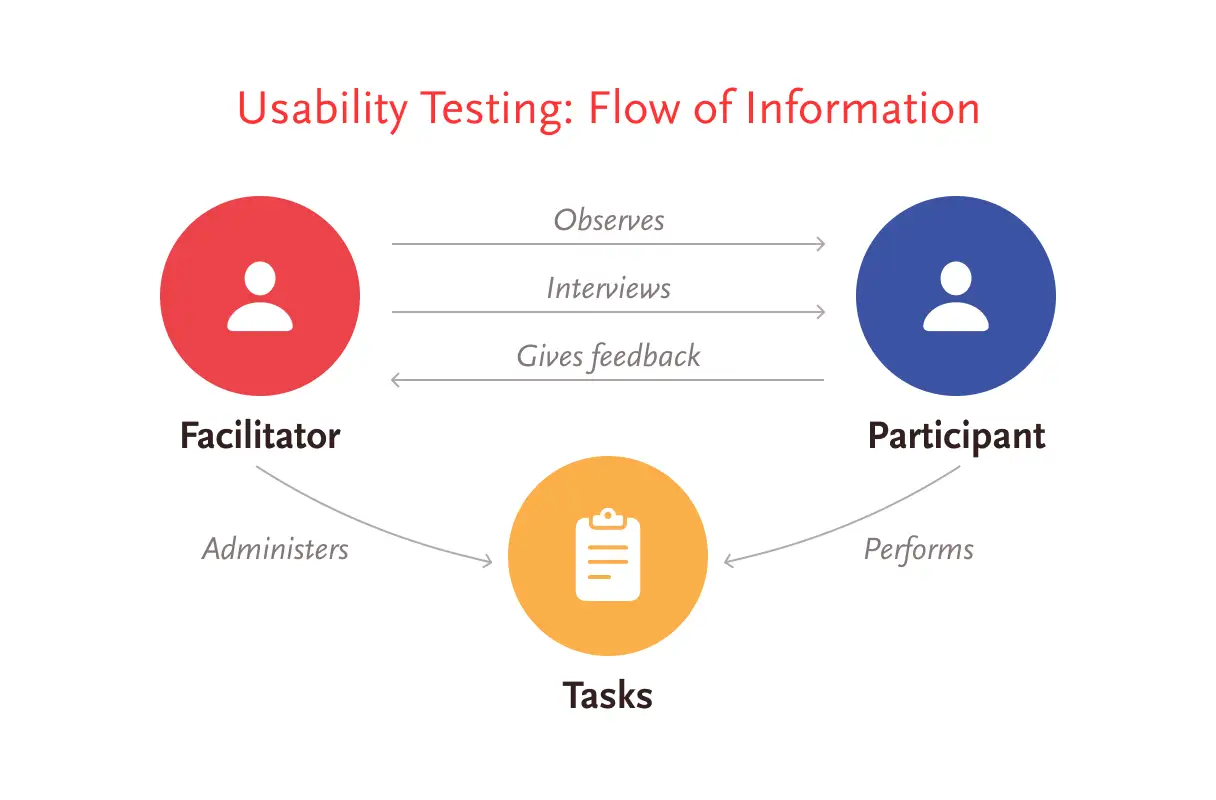
There are 3 core elements of usability testing:
- A researcher takes users through the entire process, answers their questions, follows up, collates the data, and identifies patterns.
- The test participant is a potential user performing the task.
- A task is an action the participant is asked to perform.
A usability test could be either qualitative or quantitative, and remote or in-person. For a typical qualitative study, 5 participants are enough to uncover the majority of the problems in the product.
Now, it’s the test participants’ feedback that ultimately determines your product’s future. If participants completely miss what you’ve built, you’ll need to go back to the drawing board (Empathize stage) to understand them better. But if they like your product except for a few things, return to the Prototype stage, implement the changes, improve the design, and show it to them again.
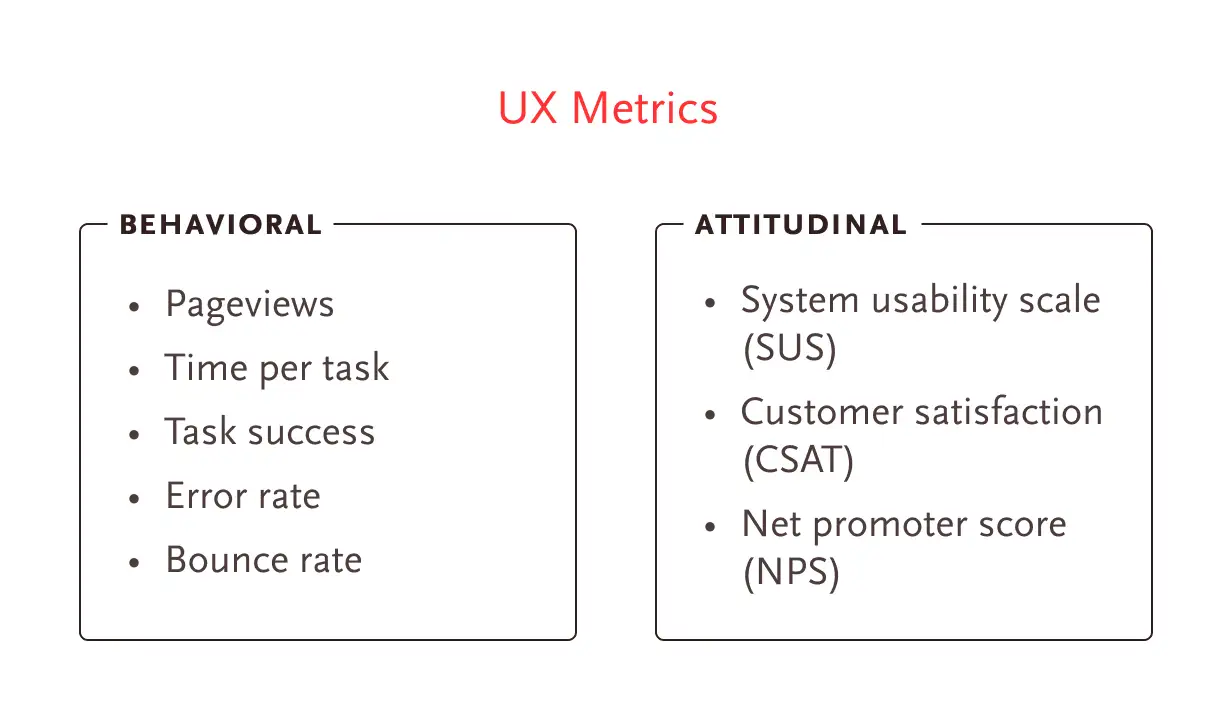
You should also be proactive and define a few key metrics to measure success, such as:
- Task success rate
- System Usability Scale (SUS)
- Net Promoter Score (NPS)
Once both you and your customers are happy with it, launch your product into the market.
So, this is Design Thinking. This article took a lot more time than I expected, even without covering everything I wanted to. There is still so much more I have inside me. But I don’t want to stretch it any further, so I’ll wrap it up here. See you in the next article.